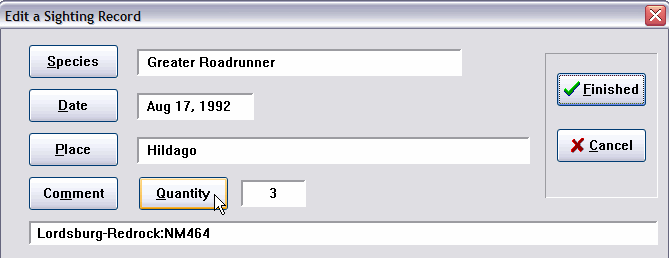
When listing sighting records, if you highlight a record and click the Edit button, the record is loaded into this edit dialog. What you do then is pretty straightforward -- just click the button for the element you want to change, and make the change with the dialog provided.
One exception is the Species edit: the new species must have been previously loaded into the Species Edit list while in the main screen by using Utils / Save Species for Edit or with Ctrl-F3. You can have up to eight species loaded for complex record edits to accomplish splits and lumps.
When you have made all the changes you wish, click Finished. To cancel the operation, click the red X Cancel button.
Look below for Mass and Complex Edit procedures:

You can apply an edit to multiple records by performing the edit on the first record, as usual, and then simply double-clicking the other records to be edited, or highlighting them and pressing Enter. The first time you select a record after an edit, you are asked Do you want to do mass edits? to confirm that you really want to edit multiple records. After that, you just double-click as many records as you like. The edit operation is applied to each successive record exactly as it was to the first. (Actually, rather than double-clicking, with two hands you can use the down-arrow and Enter keys and quickly edit hundreds of records in seconds.)
If you have been doing mass edits and then want to change the edit operation, just use the Edit button again.
Automatic Text Additions: to automatically add a text string to all comments during an edit, clear the original comment in the edit window, and then enter a “+” (plus) followed by the text you wish to insert in all comments. For example, editing the comment field to say “+windy” (don’t enter the quote marks) will add “windy” to each comment, leaving all the other comment text intact. The new text is added immediately after any quantity and initial Attribute information. If the addition of text causes the new comment to be longer than 48 characters, the comment is truncated at the end.
Automatic Text Deletions: to automatically delete a text string from all comments during a mass edit, clear the original comment in the edit window, and then enter a “-” (minus) followed by the text you wish to delete from all comments. For example, editing the comment field to say “-flugle” (don’t enter the quote marks) will delete the first instance of the text string “flugle” in all comments in edited records. All other text remains intact. The facility does not delete multiple instances of the same string. Be careful; the strings “fluglehorn” and “contraflugle” will be converted to “horn” and “contra”.
By the way, Attributes are simply text. They can be automatically inserted or deleted, too. "-/WC"
Let’s assume you entered 25 sightings with a Site of Nisqually NWR and a date of 4/28/92. You had entered the Key Word “McAllister Creek” in each of the comments to identify the specific area of the NWR where the birds were found.
Suddenly, you discover you had picked up the wrong set of field notes to enter those records! You had entered records that were actually from the north shore of Sinclair Inlet on 5/3/93.
Here’s what you do. Run a Sighting Record Listing with a Place of Nisqually NWR, and a date of 4/28/92. Now all the offending records are listed. Double-click the first bad record, or highlight it and click Edit. Select Place in the edit dialog, and select Sinclair Inlet from your Sites table. Select Date and enter 5/3/93. Select Comment and enter “-McAllister Creek +North Shore”. Click Finished. The Place and date are corrected, “McAllister Creek” is deleted from the comment, and “North Shore” is added. All other comment information, including quantity and attributes, is retained. Now double-click the next bad record and answer Yes to Do you want to do mass edits? The second record is corrected. You will receive no more prompts. As fast as you can double-click, you can correct the remaining records.
Also see, Mass Place Edits.